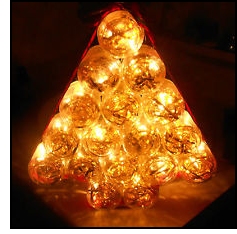
1. Remove lids and spray paint. Set aside to let dry.
2. Arrange all the jars in the shape of a Christmas tree (large triangle
with a few jars to create the stump). Make sure that the jars are all facing the same direction. (All of the jars’ lids
will be screwed on the same sides)
3. Using hot glue,
glue all of the jars together.
4. Cut 33 small strands
of wire garland (6-7 inches long) with wire cutters.
5.
Coil one strand of garland inside each jar.
6. Using
the box knife, cut a “V” into each jar lid. This “V” needs to be sticking up from the top of the lid
as this will be used to hold the lights in place.
7.
Screw on all the jar lids.
8. Take the strand of
lights and beginning with the top jar of the Christmas tree, poke one light down into the jar through the cut-out “V.”
You need to start with the first light on the strand on the opposite end from where the plug-in part is.
9. Repeat this process for each jar. Go from side to side working your
way down the rows of jars.
10. You may need
to put more than 2 lights in one jar once you get to the stump.
11. Wrap and glue the decorative ribbon around the outer edges of the tree as a finishing touch.
12. Plug-in the new tree!